
Hi everyone,
Thank you so much for being so patient with me. I have been promising to post this tutorial for a while but just couldn’t get around to doing it for health reasons. But I’m glad to report that I’m back to the land of the breathing (I had an asthma flare up) and have a super long and super detailed blog post for you.
Simple Granny Square Potholder
When I started crocheting a couple of years back, granny square was one of the first things I learned to make (like most of us do!). I found the repetitions involved in making the squares really soothing but one thing that kept annoying me was that right side slant of each and every square I ever made! At first I thought it was me, but after spending hours on Pinterest, Ravelry and YouTube, I realised that’s just something the pattern makes the square do. So I let it be and moved on to explore the zillion ( ok, not zillion but pretty close to it!) other stitches crochet has to offer.
Last year, I again picked up the hook to make a granny square for a yarn bombing project and started experimenting with how to get the square to be as straight as possible. And the method below is what worked best for me.
I have put together a detailed step by step tutorial on how to
- Make the granny square
- Join them as you go
- Make a Border
So, if you follow the tutorial, you will end up with a nice square potholder.
Simple Granny Square Potholder
The tutorial itself is also intended to help you make a granny square blanket of any size. I have put together a few details about the simple blanket I have made (the one in the pic below) at the end of this post.

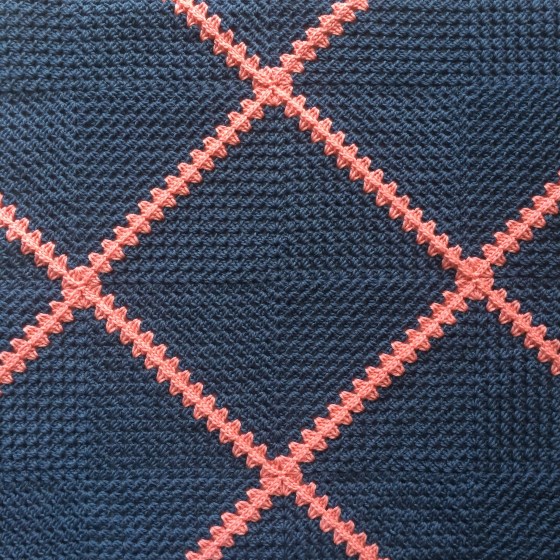
Simple Granny Square Blanket
So, gather your supplies and lets getting hooking!
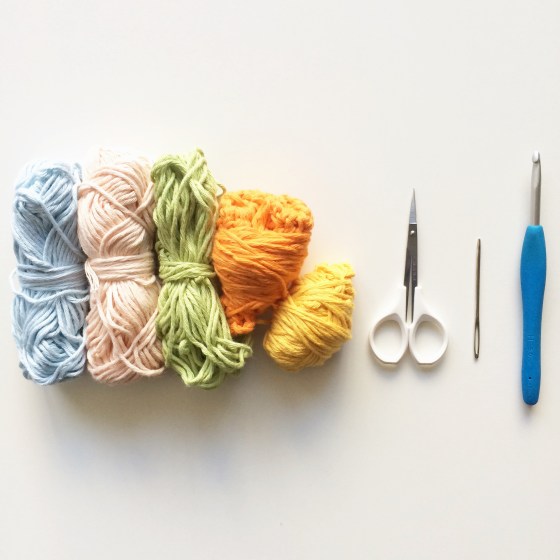
Materials
Any yarn and the recommended hook size. (I have used Drops Paris – Aran weight (10ply) cotton yarn with a 5mm hook for the tutorial below.)
A darning Needle
A pair of scissors
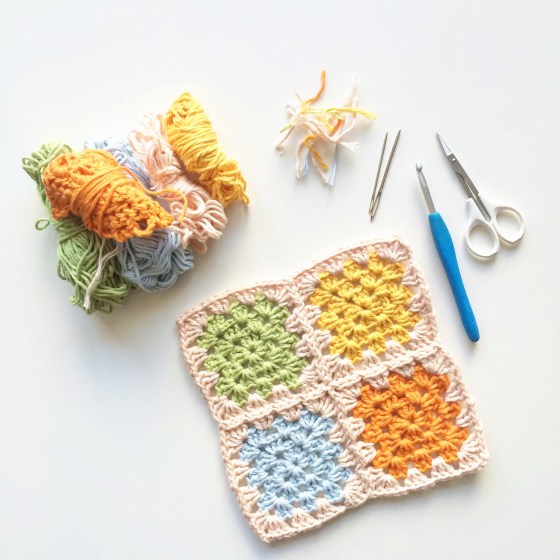
Materials for making a Simple Granny square
US Abbreviations
st – stitch
sl st – slip stitch
ch- chain
ch-sp – chain space
blo – back loop only
dc – double crochet
sc – single crochet
Pattern & Tutorial
Make the granny square
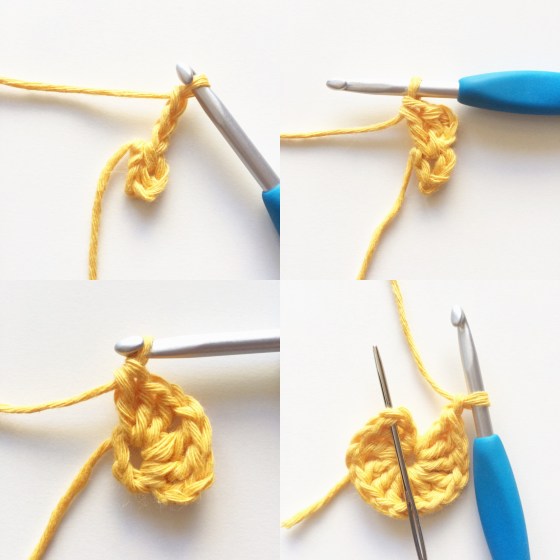
Round 1
Make a slip knot. Ch4 and sl st in the last ch from the hook to form a circle.

Round 1
Ch3 (counts as a dc), 2dc, ch1 in the circle. (3dc, ch1 ) 3 times. Join with a sl st to in the 3rd ch of the ch3.
Round 1
Round 2
Now, we start a new round in the ch sp. So sl st in the next 2 sts and in the ch1sp. (total 3 sl sts)
Round 2
(Ch3, 2 dc, ch1, 3 dc) in the same ch1sp. (3dc, ch1, 3dc) in the next 3 ch1 sps. Join with a sl st in the 3rd ch of the ch 3.

Round 2
This is where this granny square varies from the traditional way they are made. I do not ch in between the corners and only do 1 ch in the corners. This helps in making the granny straighter and not slanting to the right.
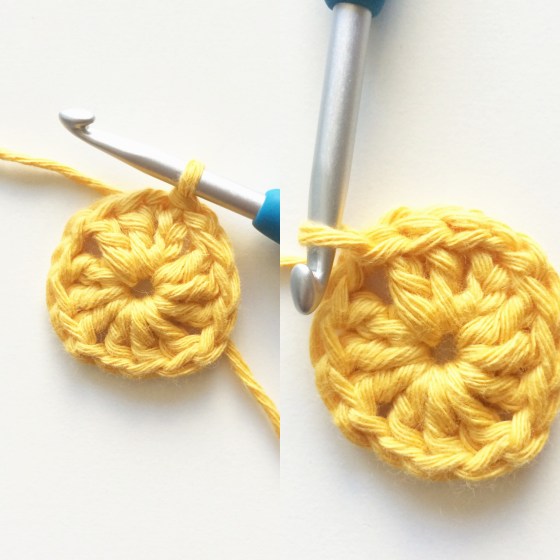
Round 3
Sl st in the next 2 sts and ch1sp (Total 3 sl sts)
(Ch3, 2dc, ch1, 3dc) in the same ch1sp. Now make 3 dcs in the sp between the 3 dcs from round 2. [(3dc, ch1, 3dc) in the next ch1sp, 3 dc between the 3 dc from round 2] 3 times. Join with a sl st in the 3rd ch of the ch3. Cut yarn and weave in the ends.
Make 3 more granny squares. (Total 4 squares consisting of 3 rounds each)
Round 3
For making a blanket, keep on increasing your granny square in the same way for as long as you want. But stop just before making the last round. We will make the last round of the square in the traditional way.
Round 4
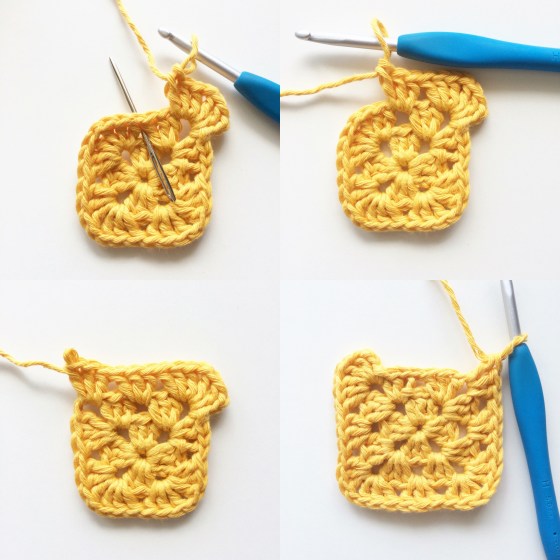
This is round 4 for me on this granny square but think of this as the last round on your granny square, however many rounds you decide to make. Also, keep in mind I’m making the changes to this round because I will be using the join as you go method for joining the granny squares. If this is not the method you intend to use, then just keep repeating round 3 and join with whatever method you like best.
Join new yarn with a sl st to any corner of the granny square.
(Ch3, 2dc, ch 2, 3dc) in the same ch1sp. [(Ch1, 3dc) in between the 3dc from round 3] 2 times.
[(3dc, ch2, 3dc) in the next corner. (ch1, 3dc) in between the 3 dcs from round 3.] 3 times. Ch1 and join with a sl st in the 3rd ch of ch3. Cut yarn and weave in the ends.

Round 4

Round 4
And your first granny square is ready!

Simple Granny Square
Join as you go
Now comes the join as you go part.
Pick any one of the remaining 3 squares you made earlier (like the green one below). Attach the joining yarn with a sl st in any ch2sp. Ch3, 2dc in the same sp. Ch1, then sl st in any ch2sp corner of the yellow granny square. 3 dc in the same ch2sp of the green granny square. This completes the first corner join. Now sl st in the next ch1 sp of the yellow granny square and then make 3 dcs in the next ch1 sp of the green granny square. Once you reach the corner, make 3 dcs in the ch1sp, sl st in the corresponding ch1sp of the green granny square. Ch1 and make 3dcs in the same ch1sp. And just like that you have joined the 2 squares!
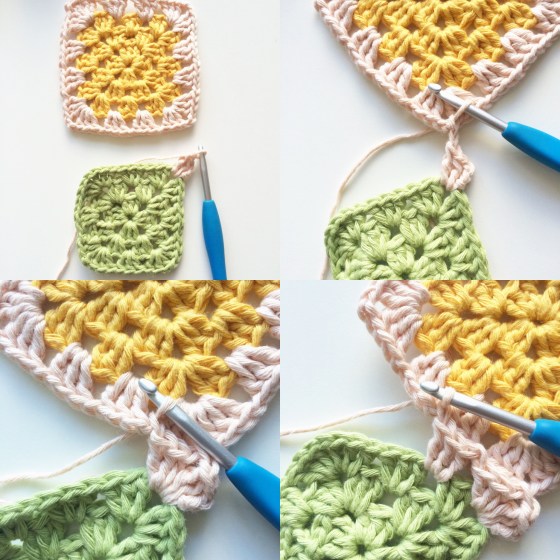
Continue along the rest of the 3 sides, making 3 dcs with ch1 in between them and 3dcs, ch2, 3dcs in the corner ch1sp.
Attach the 3rd square (the blue one in the top left pic below) exactly the same way as you did the second (the green one in the top left pic below).
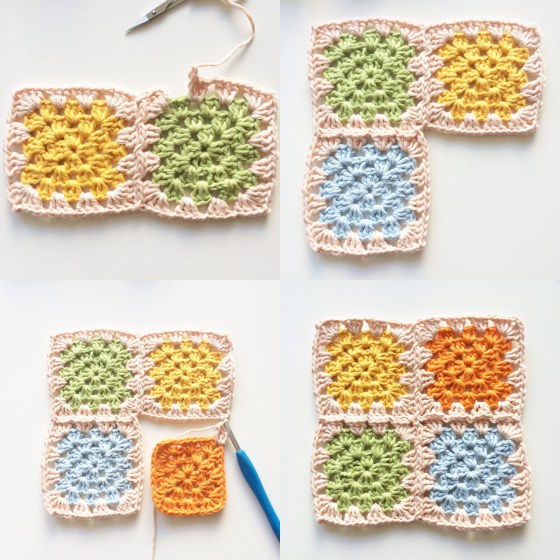
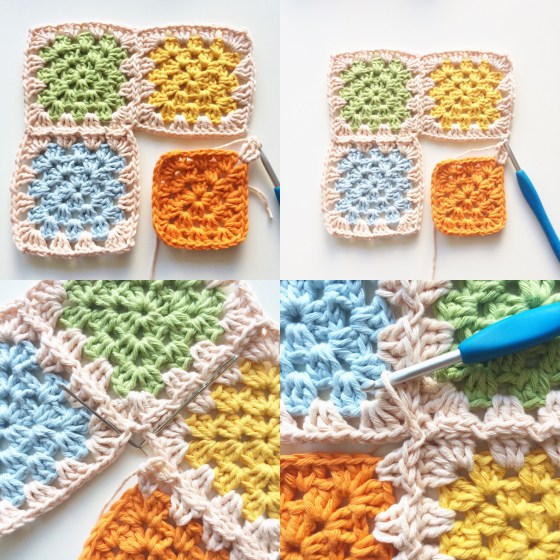
You keep joining the orange square exactly the same way mentioned above but when you come to a corner, make 3dcs, sl st in the yellow granny square (marked by needles in the bottom left pic below) and then do the next sl st in the blue granny square (marked by needles in the botton left pic below) and make 3 dcs in the same ch1sp. And continue along nonchalantly!
And in no time you would have joined all your grannies together!

Simple Granny Square Potholder
Now we make a border for our cheerful potholder.
Make a Border
Round 1
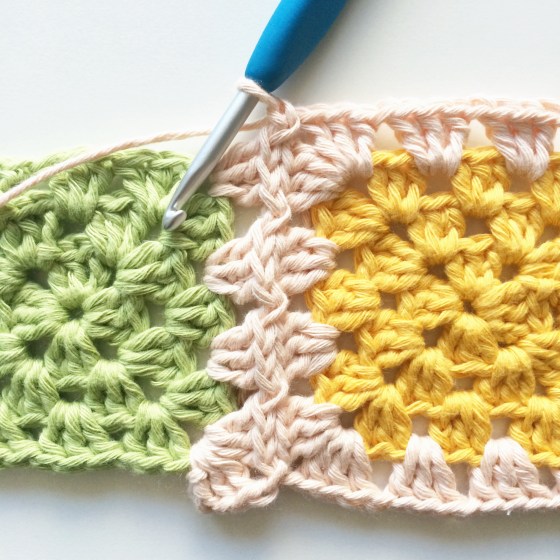
Attach yarn to any corner of the granny square blanket. Ch1 (does not count as a st) and then make (2sc, ch2, 2sc) in the same ch2sp. Continue along the edge making 1sc in each stitch. Make (2sc, ch2, 2sc) in each of the remaining 3 corners. Join with a sl st in the back loop only (blo) of the first sc.
Note: I made an sc in the space between the joins of the 2 granny squares as well. You can see that closely in the top right side pic below. I now feel that it might not be needed. I did not make that stitch in the actual granny square blanket I made. So, its completely up to you whether you want to make that stitch or not.
Round 1 of border
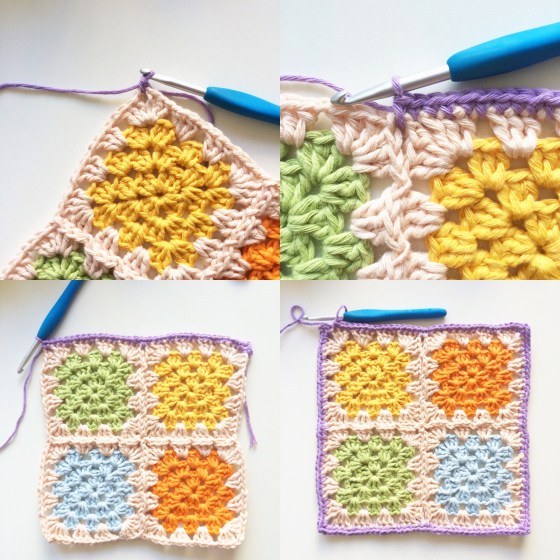
Round 2
Ch1 (does not count as a st). 1 sc in the blo of the same st as the join, in the next st and the ch1 from round1 corner sp. Then ch1 and 1 sc in the blo of the other ch1 of the same corner. Corner made for this round. Now sc across remembering to make the sts in the back loop only.

Round 2 of border
Join the round with a sl st in both the loops of the first sc. (marked by the needle in the pic below)

Round 2 of border
Round 3
Ch1 (does not count as a st). Sc in the blo of the same st as the join and the next 2 sts, ch1, sk the ch1 from round 2 and continue around making sc in the blo. Join with a sl st in both the loops of the first sc.

Round 3 of border
Round 4
I made the last round of the border using the reverse single crochet (also called the crab stitch). Now, I tried taking pictures for this tricky stitch but they just weren’t coming out right. So, here is the link to the fabulous tutorial by Brittany of bhooked crochet, that I used to learn this stitch.

Round 4 of border
This square was a little wonky because I accidently used a 4mm hook while doing the crab stitch! So I had to block it to get it into shape.
For blocking, you pin the piece on the blocking mat and spray generously with water and then leave it alone to dry.

Wet blocking the Granny Square Potholder
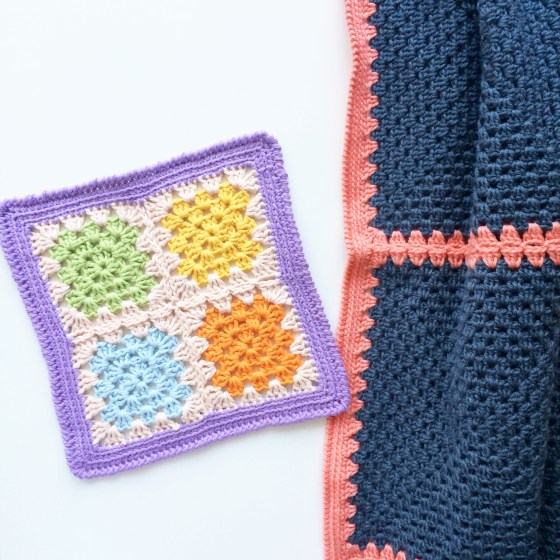
And here is our post blocked potholder.

Simple Granny Square Potholder
Phew! I hope I have covered everything but if you have any doubts about any of the steps, feel free to leave me a comment below.
Oh yes! The details about my granny square blanket. (I almost forgot!!!)

Simple Granny Square Blanket
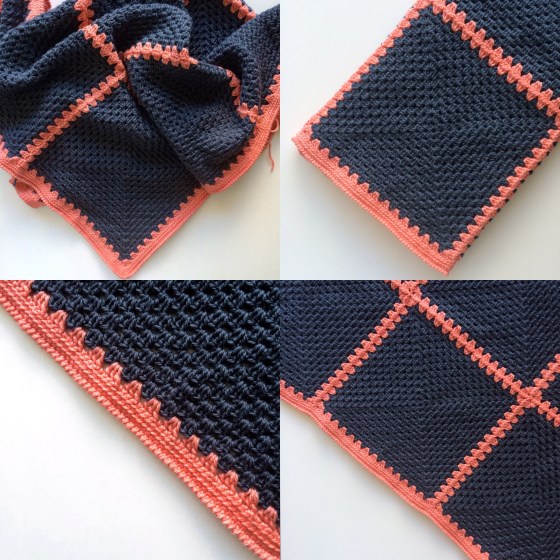
Simple Granny Square Blanket
Here we go –
- The blanket is made up of 12 squares consisting of 15 rounds each (this includes the last sorbet colour round too).
- I used Bendigo Woollen Mills Luxury wool 8 ply yarn. 4 balls of colour Slate and 1 ball of colour sorbet.
- The finished size of the blanket is 42″ (length) x 32.5″ (width)
- It’s not a very big blanket but big enough for a toddler or to be used as a lap blanket which I fully intend to do in the coming months. (Winter is coming to Australia)
- I have not blocked the squares or the blanket. I felt it just didn’t need it.
Simple Granny Square Blanket
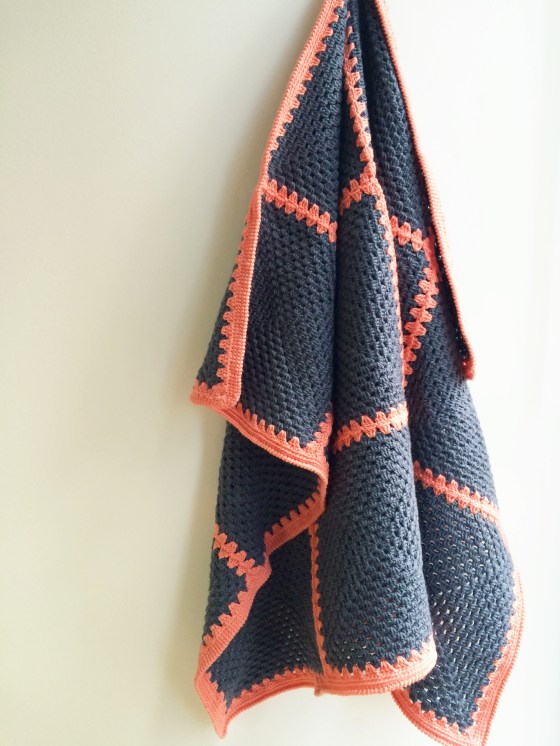
Simple Granny Square Blanket
And this is everything I wanted to share with all you lovely crocheters out there.
I hope this tutorial is of help. The possibilities of a granny square are endless and I would LOVE to see the different colour recipes you cook up. If you share your makes on Instagram, then please do tag them using #simplegrannysquare or #knitpurlhook.
Thank you so much for stopping by and sticking to the end of this reaaally long post.
Love,
Aki.

Reblogged this on adornosmalulu.
LikeLike
Thank you for this detailed tutorial!! I also was being driven kind of insane by the dreaded slanting…and I also googled all kinds of stuff to make it please go away (!) since I was making a blanket out of one huge granny square and after about 5 rounds it was really getting on my nerves, SO, I am not as resourceful as you are 🙂 and I ended up taking the ‘easy’ way out, recommended by some, to turn over the entire blanket after every round. No slant, finally, but your method is so much nicer—thanks again! (Now I just have to figure out how to block such a huge thing; do you recommend just part by part? The corners are a little too stretchy for me. Another reason to use your awesome solution…)
Have a lovely day!
Naomi (NYC)
LikeLiked by 1 person
Sorry Naomi for the late reply! I hope were able to find the best method to block the massive granny square. I have found with this method a little bit of wet blocking works great. Thank you again for stopping by! ☺️
LikeLike
Thank you so much for your perfect tutorial. I have already had an eye on your blanket, it’s so beautiful! I have had the same problem with my twisted grannies, tried many different ways that didn’t work for me and ended up like Naomi turning my granny after every round, which actually looked very good. Next time I will try your method and see if that works better for me. Thanks again for sharing!
LikeLiked by 1 person
Thank you so much for stopping by. Sorry about the super late reply. I hope you had a chance to give this method a try! 💖
LikeLike
Love the blanket, do you have the pattern for the grey squares?
LikeLiked by 1 person
i have given a few points on how to make the same blanket. It’s just granny squares with the last round done in a different colour and joined together. You see the notes above the last pic.
LikeLike
makes me want to learn to crochet. i only knit which i have taught myself to knit so now im going to learn crochet. thank for the very detailed pattern
LikeLiked by 1 person
Thanks Kim! I can totally understand! I taught myself to crochet and then knit. I hope you did end of giving crochet a try! ☺️
LikeLike
I would LOVE to know how to make the blanket. It is gorgeous.
LikeLiked by 1 person
Thanks Christy! I have written all the details on how to make the exact blanket. It’s just above the last pic in the post above. 💖
LikeLike
I cannot figure out how you are attaching the grannies the instructions do not make sense to me for the join as you go. I keep pulling it out and retrying but is not right
LikeLike
Sorry for the late reply Dawn. Hope you were able to figure out how it’s done. I have shown the entire process in the photo tutorial. Let me know if you need any further assistance. Happy to help.
LikeLike
Love the blanket. Do you have the pattern for the granny square blanket.
LikeLiked by 1 person
Thanks Amy! I have written all the details on how to make the exact blanket. It’s just above the last pic in the post above. 💖
LikeLike
I ‘m still trying to figure it out I try praticing every day but it’s not coming out right but as they say practice makes perfect.
LikeLiked by 1 person
Let me know if you need any help from my side. Once you are able to crack it then there is no going back. 💖
LikeLike
Hi Aki
Is it essential to use cotton yarn for the pot holder? Just I find it hard to get nice coloured cotton yarn
LikeLike
You can use 100% wool yarn as well. The only yarn to avoid is acrylic. If you not going to use the potholder to keep anything warm on it, then feel free to use any yarn including acrylic. Only if you plan to use it to keep hot pots, then use 100% cotton or wool yarn as they can both withstand heat. Hope this helps. 😊
LikeLike
Pingback: 23 Free and Simple Crochet Potholder and Hot Pad Patterns - Stitch11
Pingback: 112 Free Crochet Potholder Patterns ⋆ DIY Crafts
Pingback: Fun And Colorful Granny Squares - Pattern Center